

GUI Programming In Python
Graphical User Interfaces (GUIs) provide an interactive and visual way for users to interact with software applications. They are made up of windows, buttons, text boxes, menus, checkboxes, and other elements, and allow users to perform tasks without needing to know any programming language.
Overview of GUI frameworks (Tkinter, PyQt, etc.)
Python has a variety of libraries that allow for the creation of GUIs. Two of the most popular ones are Tkinter and PyQt.
Tkinter
This is the standard GUI library for Python. It is easy to use and is included with most Python installations. Here’s a very simple example of a Tkinter GUI:
import tkinter as tk

def display_hello():
    print("Hello, World!")

root = tk.Tk()
button = tk.Button(root, text="Click me!", command=display_hello)
button.pack()

root.mainloop()
This creates a new window with a single button. When the button is clicked, it displays “Hello, World!” in the console.

PyQt
This is a set of Python bindings for the Qt application framework, which is more powerful (and more complex) than Tkinter. It’s a good choice for more advanced GUIs. Here’s a simple example:
from PyQt5.QtWidgets import QApplication, QWidget, QPushButton

def display_hello():
    print("Hello, World!")

app = QApplication([])

window = QWidget()
button = QPushButton("Click me!", window)
button.clicked.connect(display_hello)
window.show()

app.exec_()
This does the same thing as the previous example but uses PyQt instead of Tkinter. When the button is clicked, it displays “Hello, World!” in the console.

Both of these libraries offer much more than just windows and buttons. They allow you to create menus, dialog boxes, custom drawings, handle user input, and more. Creating a GUI can get quite complex, but it’s a powerful way to allow users to interact with your Python programs.
Building a basic GUI application
Let’s build a very basic GUI application using tkinter that simulates a simple vehicle manager. Our application will have input fields for adding a new vehicle to a list, and it will display the current list of vehicles.
import tkinter as tk
from tkinter import messagebox
class VehicleManager:
def __init__(self):
self.vehicles = []
def add_vehicle(self, brand, model):
self.vehicles.append({'brand': brand, 'model': model})
def get_vehicles(self):
return self.vehicles
class Application(tk.Frame):
def __init__(self, master=None):
super().__init__(master)
self.master = master
self.pack()
self.vehicle_manager = VehicleManager()
self.create_widgets()
def create_widgets(self):
self.brand_label = tk.Label(self, text="Brand:")
self.brand_label.pack()
self.brand_entry = tk.Entry(self)
self.brand_entry.pack()
self.model_label = tk.Label(self, text="Model:")
self.model_label.pack()
self.model_entry = tk.Entry(self)
self.model_entry.pack()
self.add_button = tk.Button(self)
self.add_button["text"] = "Add Vehicle"
self.add_button["command"] = self.add_vehicle
self.add_button.pack()
self.quit = tk.Button(self, text="QUIT", fg="red",
command=self.master.destroy)
self.quit.pack()
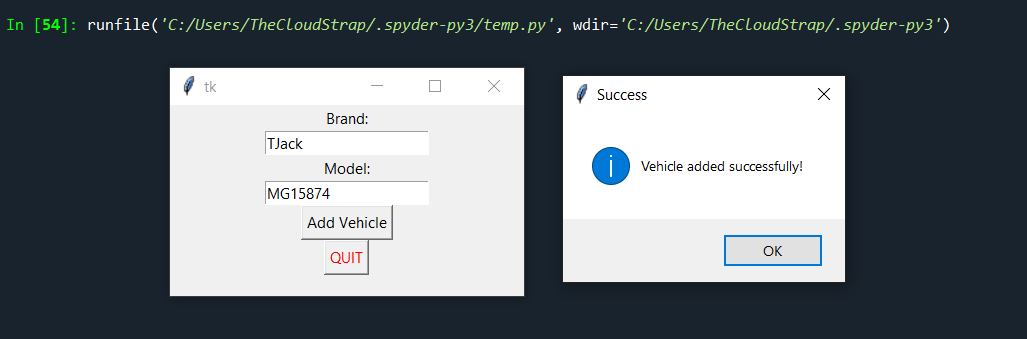
def add_vehicle(self):
brand = self.brand_entry.get()
model = self.model_entry.get()
self.vehicle_manager.add_vehicle(brand, model)
messagebox.showinfo("Success", "Vehicle added successfully!")
self.brand_entry.delete(0, tk.END)
self.model_entry.delete(0, tk.END)
for vehicle in self.vehicle_manager.get_vehicles():
print(vehicle)
root = tk.Tk()
app = Application(master=root)
app.mainloop()
In this application, we have two text fields where the user can enter a vehicle’s brand and model. When the user clicks the “Add Vehicle” button, the brand and model are added to the list of vehicles in the VehicleManager class, and a message box is shown to confirm that the vehicle was added. The list of vehicles is also printed on the console each time a vehicle is added.


Note that this application does not persist the vehicles between runs. If you close and re-open the application, the list of vehicles will be empty.
Let’s create a more complex GUI application that provides an interface for managing a vehicle inventory. For simplicity, we’ll store the inventory data in memory, so it will be lost when the program closes. In a real-world application, you’d likely want to store this data in a database or a file.
We’ll use the tkinter library and also tk which is a themed widget set that provides a more modern look and feel than plain tkinter.
Here is the detailed lengthy complex code:
import tkinter as tk
from tkinter import ttk, messagebox
class Vehicle:
def __init__(self, id, brand, model, year, mileage):
self.id = id
self.brand = brand
self.model = model
self.year = year
self.mileage = mileage
class VehicleInventory:
def __init__(self):
self.vehicles = []
self.next_id = 1
def add_vehicle(self, brand, model, year, mileage):
vehicle = Vehicle(self.next_id, brand, model, year, mileage)
self.vehicles.append(vehicle)
self.next_id += 1
return vehicle
class Application:
def __init__(self, root):
self.root = root
self.vehicle_inventory = VehicleInventory()
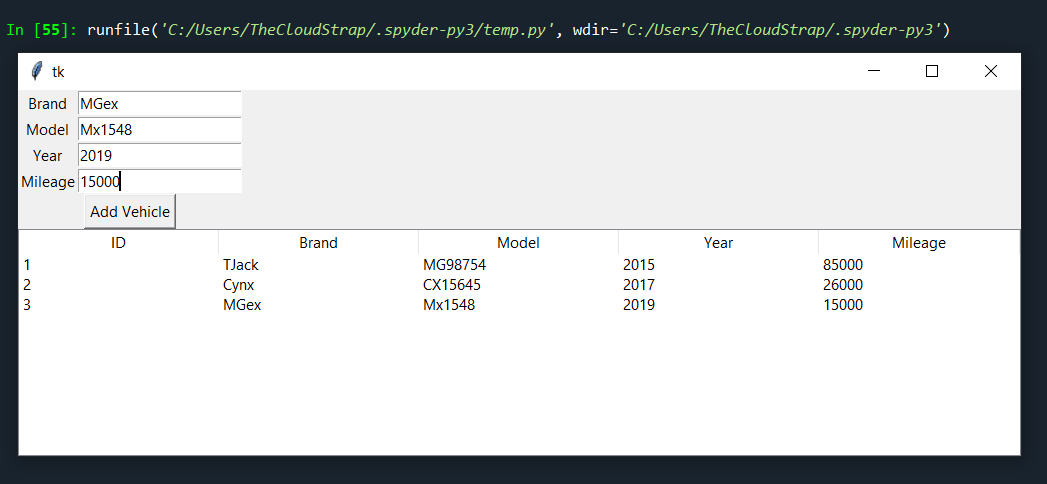
# Frame for new vehicle input
input_frame = tk.Frame(self.root)
input_frame.pack(fill="x")
# Entry fields for new vehicle
self.brand_var = tk.StringVar()
tk.Label(input_frame, text="Brand").grid(row=0, column=0)
tk.Entry(input_frame, textvariable=self.brand_var).grid(row=0, column=1)
self.model_var = tk.StringVar()
tk.Label(input_frame, text="Model").grid(row=1, column=0)
tk.Entry(input_frame, textvariable=self.model_var).grid(row=1, column=1)
self.year_var = tk.IntVar()
tk.Label(input_frame, text="Year").grid(row=2, column=0)
tk.Entry(input_frame, textvariable=self.year_var).grid(row=2, column=1)
self.mileage_var = tk.IntVar()
tk.Label(input_frame, text="Mileage").grid(row=3, column=0)
tk.Entry(input_frame, textvariable=self.mileage_var).grid(row=3, column=1)
# Button to add a new vehicle
add_button = tk.Button(input_frame, text="Add Vehicle", command=self.add_vehicle)
add_button.grid(row=4, columnspan=2)
# Treeview to show the inventory
self.inventory_tree = ttk.Treeview(self.root, columns=('ID', 'Brand', 'Model', 'Year', 'Mileage'), show='headings')
self.inventory_tree.pack(fill="both", expand=True)
for col in ('ID', 'Brand', 'Model', 'Year', 'Mileage'):
self.inventory_tree.heading(col, text=col)
def add_vehicle(self):
brand = self.brand_var.get()
model = self.model_var.get()
year = self.year_var.get()
mileage = self.mileage_var.get()
vehicle = self.vehicle_inventory.add_vehicle(brand, model, year, mileage)
self.inventory_tree.insert('', 'end', values=(vehicle.id, vehicle.brand, vehicle.model, vehicle.year, vehicle.mileage))
messagebox.showinfo("Success", "Vehicle added successfully!")
root = tk.Tk()
app = Application(root)
root.mainloop()

Handling events and user input
Automotive software testing often involves creating simulations or mockups of various parts of a vehicle, then creating scenarios to simulate user interactions or environmental conditions and checking if the software responds correctly. For the purpose of this example, we’ll create a simple simulation for testing the software of a car’s multimedia system.
In Python, we would start by creating a class for the car multimedia system that has some attributes and methods to respond to user inputs and some events. The code might look like this:
import tkinter as tk

class MultimediaSystem:
    def __init__(self):
        self.volume = 0
        self.radio_station = None
        self.cd_player = False
        self.bluetooth_connected = False

    def change_volume(self, new_volume):
        if 0 <= new_volume <= 100:
            self.volume = new_volume
            return f"Volume changed to {self.volume}"
        else:
            return "Invalid volume. Range is 0-100"

    def tune_radio(self, station):
        self.radio_station = station
        return f"Tuned to {self.radio_station}"

    def cd_player_toggle(self):
        self.cd_player = not self.cd_player
        return f"CD Player {'ON' if self.cd_player else 'OFF'}"

    def bluetooth_connection_toggle(self):
        self.bluetooth_connected = not self.bluetooth_connected
        return f"Bluetooth {'Connected' if self.bluetooth_connected else 'Disconnected'}"

class Car:
    def __init__(self):
        self.multimedia_system = MultimediaSystem()
        self.engine_status = False
        self.door_open = False

    def start_engine(self):
        self.engine_status = True
        return "Engine started."

    def stop_engine(self):
        self.engine_status = False
        return "Engine stopped."

    def open_door(self):
        self.door_open = True
        return "Door opened."

    def close_door(self):
        self.door_open = False
        return "Door closed."

# Create an instance of Car
car = Car()

# Create main window
root = tk.Tk()

def handle_start_engine_button_click():
    result = car.start_engine()
    result_label.config(text=result)

def handle_open_door_button_click():
    result = car.open_door()
    result_label.config(text=result)

def handle_tune_radio_button_click():
    station = radio_station_entry.get()
    result = car.multimedia_system.tune_radio(station)
    result_label.config(text=result)

def handle_change_volume_button_click():
    new_volume = volume_scale.get()
    result = car.multimedia_system.change_volume(new_volume)
    result_label.config(text=result)

# Add buttons for starting engine and opening door
start_engine_button = tk.Button(root, text="Start engine", command=handle_start_engine_button_click)
start_engine_button.pack()

open_door_button = tk.Button(root, text="Open door", command=handle_open_door_button_click)
open_door_button.pack()

# Add entries and buttons for tuning radio and changing volume
radio_station_entry = tk.Entry(root)
radio_station_entry.pack()
tune_radio_button = tk.Button(root, text="Tune radio", command=handle_tune_radio_button_click)
tune_radio_button.pack()

volume_scale = tk.Scale(root, from_=0, to=100, orient=tk.HORIZONTAL)
volume_scale.pack()
change_volume_button = tk.Button(root, text="Change volume", command=handle_change_volume_button_click)
change_volume_button.pack()

# Add label for displaying results
result_label = tk.Label(root, text="")
result_label.pack()

# Run main loop
root.mainloop()
This script creates a simple GUI where you can start the car’s engine, open the car door, tune the radio to a specific station, and adjust the volume. The GUI includes text fields for inputting radio station and volume, buttons for executing actions, and a label for displaying results.
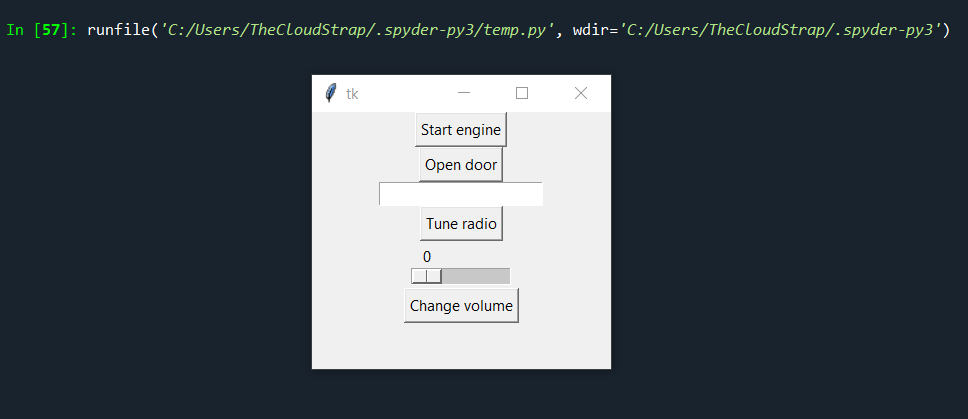

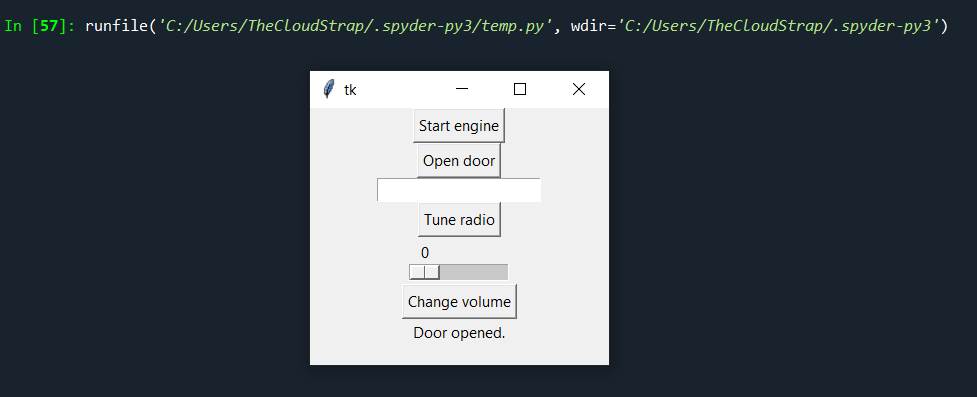


The command argument in the tk.Button function is used to handle button click events. When a button is clicked, the corresponding function is called, which in turn calls a method on the Car or MultimediaSystem instance and updates the result_label with the result.
This is a basic example and doesn’t include all of the potential features of a car multimedia system or all possible user inputs or events. It also doesn’t include any error checking on the user inputs. These would be important considerations for a real automotive software testing system.
Adding widgets and layout management
In this example, we’ll add more widgets to our multimedia system and manage the layout using frames and grid layout management. This will make our GUI look more structured and organized. We’ll add functionalities for Bluetooth connection and CD player status in the multimedia system.
import tkinter as tk

class MultimediaSystem:
    def __init__(self):
        self.volume = 0
        self.radio_station = None
        self.cd_player = False
        self.bluetooth_connected = False

    def change_volume(self, new_volume):
        if 0 <= new_volume <= 100:
            self.volume = new_volume
            return f"Volume changed to {self.volume}"
        else:
            return "Invalid volume. Range is 0-100"

    def tune_radio(self, station):
        self.radio_station = station
        return f"Tuned to {self.radio_station}"

    def cd_player_toggle(self):
        self.cd_player = not self.cd_player
        return f"CD Player {'ON' if self.cd_player else 'OFF'}"

    def bluetooth_connection_toggle(self):
        self.bluetooth_connected = not self.bluetooth_connected
        return f"Bluetooth {'Connected' if self.bluetooth_connected else 'Disconnected'}"

class Car:
    def __init__(self):
        self.multimedia_system = MultimediaSystem()
        self.engine_status = False
        self.door_open = False

    def start_engine(self):
        self.engine_status = True
        return "Engine started."

    def stop_engine(self):
        self.engine_status = False
        return "Engine stopped."

    def open_door(self):
        self.door_open = True
        return "Door opened."

    def close_door(self):
        self.door_open = False
        return "Door closed."

# Create an instance of Car
car = Car()

# Create main window
root = tk.Tk()
root.title('Automotive Software Testing')

# Create frames
frame1 = tk.Frame(root)
frame1.grid(row=0, column=0)

frame2 = tk.Frame(root)
frame2.grid(row=1, column=0)

frame3 = tk.Frame(root)
frame3.grid(row=2, column=0)

def handle_start_engine_button_click():
    result = car.start_engine()
    result_label.config(text=result)

def handle_open_door_button_click():
    result = car.open_door()
    result_label.config(text=result)

def handle_tune_radio_button_click():
    station = radio_station_entry.get()
    result = car.multimedia_system.tune_radio(station)
    result_label.config(text=result)

def handle_change_volume_button_click():
    new_volume = volume_scale.get()
    result = car.multimedia_system.change_volume(new_volume)
    result_label.config(text=result)

def handle_cd_player_button_click():
    result = car.multimedia_system.cd_player_toggle()
    result_label.config(text=result)

def handle_bluetooth_button_click():
    result = car.multimedia_system.bluetooth_connection_toggle()
    result_label.config(text=result)

# Add buttons for starting engine and opening door
start_engine_button = tk.Button(frame1, text="Start engine", command=handle_start_engine_button_click)
start_engine_button.grid(row=0, column=0)

open_door_button = tk.Button(frame1, text="Open door", command=handle_open_door_button_click)
open_door_button.grid(row=0, column=1)

# Add entries and buttons for tuning radio and changing volume
radio_station_entry = tk.Entry(frame2)
radio_station_entry.grid(row=0, column=0)
tune_radio_button = tk.Button(frame2, text="Tune radio", command=handle_tune_radio_button_click)
tune_radio_button.grid(row=0, column=1)

volume_scale = tk.Scale(frame2, from_=0, to=100, orient=tk.HORIZONTAL)
volume_scale.grid(row=1, column=0)
change_volume_button = tk.Button(frame2, text="Change volume", command=handle_change_volume_button_click)
change_volume_button.grid(row=1, column=1)

# Add buttons for CD player and Bluetooth connection
cd_player_button = tk.Button(frame3, text="Toggle CD Player", command=handle_cd_player_button_click)
cd_player_button.grid(row=0, column=0)

bluetooth_button = tk.Button(frame3, text="Toggle Bluetooth", command=handle_bluetooth_button_click)
bluetooth_button.grid(row=0, column=1)

# Add label for displaying results
result_label = tk.Label(root, text="")
result_label.grid(row=3, column=0)

# Run main loop
root.mainloop()
This code creates a GUI with three frames arranged vertically. Each frame contains a pair of related controls (such as a button and a text field, or two buttons), which are arranged horizontally.

It adds functionalities for CD player and Bluetooth connection, where you can toggle the status of CD player and Bluetooth connection. The status of the operation is displayed on the label at the bottom of the GUI.


Tkinter’s grid layout manager is used to arrange the frames and controls. Each widget is placed in a cell of the grid, and the cell expands to fit the widget. Grid layout is more flexible than pack layout because it allows you to align widgets relative to each other and control the amount of space around them.

This post was published by Admin.
Email: admin@TheCloudStrap.Com