

DOORS DXL Tutorial Part 3
In this series of articles, I am going to explain to you IBM DOORS DXL scripting from scratch. So, if you are a beginner in DXL scripting, hopefully, this article will help you. This is part-3 of the DOORS DXL tutorial.
So, if you are looking for a starting point to learn DXL scripting, you are on the right page! I know, we have the DXL reference manual and it’s a bit concise and difficult to grasp for beginners, especially if you do not have any previous experience in other programming languages.
In the previous article (Part-1,2), we explained how to write a simple Hello World program and data types. In this article series, we will mainly discuss the character type in DXL.
Character in DXL
A character type in DXL can hold the ASCII Character.
Here is the list of functions that can be applied to a character in DXL:
- bool isalpha(char chr)
- bool islower(char chr)
- bool isupper(char chr)
- bool isdigit(char chr)
- bool isxdigit(char chr)
- bool isalnum(char chr)
- bool isspace(char chr)
- bool iscntrl(char chr)
- bool ispunct(char chr)
- bool isgraph(char chr)
These functions can be used to check if a character is of a certain type of character. For example, isupper() can be used to check if the character is an uppercase character. The “isupper()” function will return true in case the character is an upper case character, otherwise, it will return false.
- alpha –> ‘a’ – ‘z’ ‘A’ – ‘Z’
- upper –> ‘A’ – ‘Z’
- lower –> ‘a’ – ‘z’
- digit –> ‘0’ – ‘9’
- xdigit –> ‘0’ – ‘9’ ‘A’ – ‘F’ ‘a’ – ‘f’
- alnum –> ‘a’ – ‘z’ ‘A’ – ‘Z’ ‘0’ – ‘9’
- space –> ‘ ‘ ‘\t’ ‘\n’
- cntrl –> any character code between 0 to 31
- punct –> Other than space and alphanumeric characters
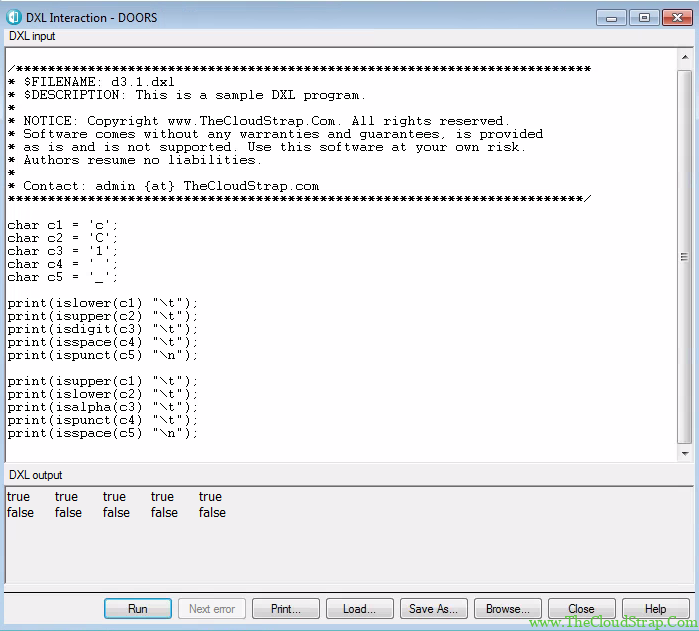
Here is an example code:
// www.TheCloudStrap.Com

/************************************************************************
* $FILENAME: d3.1.dxl
* $DESCRIPTION: This is a sample DXL program.
*
* NOTICE: Copyright www.TheCloudStrap.Com. All rights reserved.
* Software comes without any warranties and guarantees, is provided
* as is and is not supported. Use this software at your own risk.
* Authors resume no liabilities.
*
* Contact: admin {at} TheCloudStrap.com
************************************************************************/

char c1 = 'c';
char c2 = 'C';
char c3 = '1';
char c4 = ' ';
char c5 = '_';

print(islower(c1) "\t");
print(isupper(c2) "\t");
print(isdigit(c3) "\t");
print(isspace(c4) "\t");
print(ispunct(c5) "\n");

print(isupper(c1) "\t");
print(islower(c2) "\t");
print(isalpha(c3) "\t");
print(ispunct(c4) "\t");
print(isspace(c5) "\n");
We have declared five character variables and assigned different types of characters.
charOf() function
Now, let us see another very useful function to get ASCII characters from a given integer. The declaration of the charOf() function is as follows:
char charOf (int i)
Here is another example DXL script:
// www.TheCloudStrap.Com

/************************************************************************
* $FILENAME: d3.2.dxl
* $DESCRIPTION: This is a sample DXL program.
*
* NOTICE: Copyright www.TheCloudStrap.Com. All rights reserved.
* Software comes without any warranties and guarantees, is provided
* as is and is not supported. Use this software at your own risk.
* Authors resume no liabilities.
*
* Contact: admin {at} TheCloudStrap.com
************************************************************************/

int i = 65;

print(charOf(i) "\t\n");

// print all the ASCII characters from 65 to 90
for i in 65:90 by 1 do{
	print(charOf(i) "\t");
}

print("\n")

// print all the ASCII characters from 97 to 122
for i in 97:122 by 1 do{
	print(charOf(i) "\t");
}
In this program, we first declared and initialized an integer variable i.e. “i” to 65. The decimal value of ASCII character “A” is 65. Then, we passed the “i” to the charOf() function which returns the character “A”. The print function then prints the character “A” on the DXL output window.
We have then printed all the upper case and lower case ASCII characters by using a for loop. We have not discussed the for a loop yet, but I have just used the for loop to demonstrate the usage of charOf() function.

Conclusion
This was part-3 of the DOORS DXL tutorial. The intention of this article was just to familiarize you with DOORS DXL and show you different data types that are supported by DXL scripting. Please comment below if you have any questions/suggestions.
In the next DOORS DXL tutorial, I will discuss about the strings and how to use strings in DXL.

This post was published by Admin.
Email: admin@TheCloudStrap.Com
3 thoughts on “DOORS DXL – Character”
Comments are closed.